常用的 ping,tracert,nslookup 一般用来判断主机的网络连通性,其实 Linux 下有一个更好用的网络联通性判断工具,它可以结合ping nslookup tracert 来判断网络的相关特性,这个命令就是 mtr。mtr 全称 my traceroute,是一个把 ping 和 traceroute 合并到一个程序的网络诊断工具。
traceroute默认使用UDP数据包探测,而mtr默认使用ICMP报文探测,ICMP在某些路由节点的优先级要比其他数据包低,所以测试得到的数据可能低于实际情况, 参数 -U 使用UDP数据包探测 。
安装方法
1.Windows系统可以直接在https://cdn.ipip.net/17mon/besttrace.exe下载BestTrace工具并安装。也可以在https://github.com/oott123/WinMTR/releases GitHub上下载MTR专用工具,该工具为免安装,下载后可以直接使用。
2.Linux可以直接运行命令进行安装。
1.# Debian/Ubuntu 系统
2.apt install mtr
3.
4.# RedHat/CentOS 系统
5.yum install mtr
3.Apple客户端可以在App store搜索Best NetTools下载安装
4.Android客户端:可以在Google Play上下载TracePing,但是由于国内Google Play无法访问,笔者自行下载下来,可以直接访问 https://dwz.cn/KCdNPH4c 下载TracePing。
使用
MTR使用非常简单,查看本机到 http://qq.com 的路由以及连接情况直接运行如下命令:
1.mtr qq.com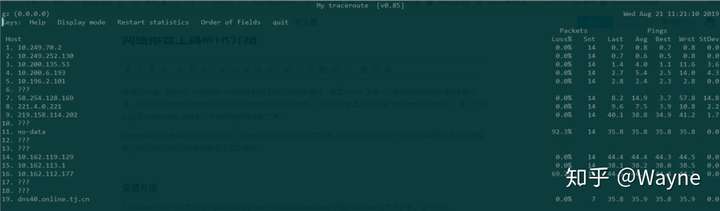
MTR http://qq.com 测试界面
具体输出的参数含义为:
- 第一列是IP地址
- 丢包率:Loss
- 已发送的包数:Snt
- 最后一个包的延时:Last
- 平均延时:Avg
- 最低延时:Best
- 最差延时:Wrst
- 方差(稳定性):StDev
参数说明
-r or –report
使用 mtr -r http://qq.com 来打印报告,如果不使用 -r or –report 参数 mtr 会不断动态运行。使用 report 选项, mtr 会向 http://qq.com 主机发送 10 个 ICMP 包,然后直接输出结果。通常情况下 mtr 需要几秒钟时间来输出报告。mtr 报告由一系列跳数组成,每一跳意味着数据包通过节点或者路由器来达到目的主机。
一般情况下 mtr 前几跳都是本地 ISP,后几跳属于服务商比如 腾讯数据中心,中间跳数则是中间节点,如果发现前几跳异常,需要联系本地 ISP 服务提供上,相反如果后几跳出现问题,则需要联系服务提供商,中间几跳出现问题,则需要联系运营商进行处理
默认使用 -r 参数来生成报告,只会发送10个数据包,如果想要自定义数据包数量,可以使用 -c 参数
-s or –packetsize
使用 -s 来指定ping数据包的大小
1.mtr -s 100 qq.com100 bytes 数据包会用来发送,测试,如果设置为负数,则每一次发送的数据包的大小都会是一个随机数。
-c
指定发送数量
1.mtr -c 100 qq.com-n
不进行主机解释
使用 -n 选项来让 mtr 只输出 IP,而不对主机 host name 进行解释
1.mtr -n qq.comMTR结果分析
当我们分析 MTR 报告时候,最好找出每一跳的任何问题。除了可以查看两个服务器之间的路径之外,MTR 在它的七列数据中提供了很多有价值的数据统计报告。Loss% 列展示了数据包在每一跳的丢失率。Snt 列记录的多少个数据包被送出。使用 –report 参数默认会送出10个数据包。如果使用 –report-cycles=[number-of-packets] 选项,MTR 就会按照 [number-of-packets] 指定的数量发出 ICMP 数据包。
Last, Avg, Best 和 Wrst 列都标识数据包往返的时间,使用的是毫秒( ms )单位表示。Last 表示最后一个数据包所用的时间, Avg 表示评价时间, Best 和 Wrst 表示最小和最大时间。在大多数情况下,平均时间( Avg)列需要我们特别注意。
最后一列 StDev 提供了数据包在每个主机的标准偏差。如果标准偏差越高,说明数据包在这个节点的延时越不相同。标准偏差会让您了解到平均延时是否是真的延时时间的中心点,或者测量数据受到某些问题的干扰。
例如,如果标准偏差很大,说明数据包的延迟是不确定的。一些数据包延迟很小(例如:25ms),另一些数据包延迟很大(例如:350ms)。当10个数据包全部发出后,得到的平均延迟可能是正常的,但是平均延迟是不能很好的反应实际情况的。如果标准偏差很高,使用最好和最坏的延迟来确定平均延迟是一个较好的方案。
在大多数情况下,您可以把 MTR 的输出分成三大块。根据配置,第二或第三跳一般都是您的本地 ISP,倒数第二或第三跳一般为您目的主机的ISP。中间的节点是数据包经过的路由器。
当分析 MTR 的输出时,您需要注意两点:loss 和 latency。
网络丢包
如果在任何一跳上看到 loss 的百分比,这就说明这一跳上可能有问题了。当然,很多服务提供商人为限制 ICMP 发送的速率,这也会导致此问题。那么如何才能指定是人为的限制 ICMP 传输 还是确定有丢包的现象?此时需要查看下一跳。如果下一跳没有丢包现象,说明上一条是人为限制的。如下示例:
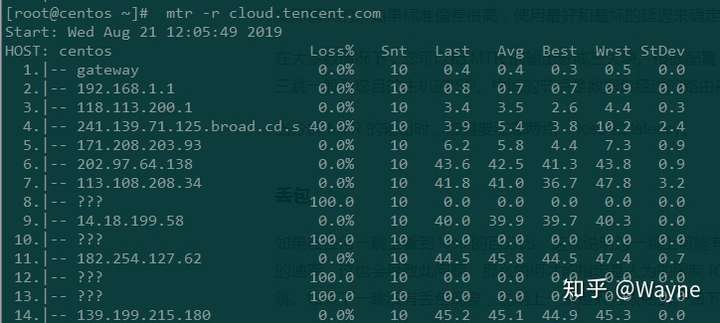
人为限制MTR丢包
在此例中,第4跳发生了丢包现象,但是接下来几条都没任何丢包现象,说明第二跳的丢包是人为限制的。如果在接下来的几条中都有丢包,那就可能是第二跳有问题了。请记住,ICMP 包的速率限制和丢失可能会同时发生。
MTR丢包截图
从上面的图中,您可以看从第13跳和第17跳都有 10% 的丢包率,从接下来的几跳都有丢包现象,但是最后15,16跳都是100%的丢包率,我们可以猜测到100%的丢包率除了网络糟糕的原因之前还有人为限制 ICMP。所以,当我们看到不同的丢包率时,通常要以最后几跳为准。
还有很多时候问题是在数据包返回途中发生的。数据包可以成功的到达目的主机,但是返回过程中遇到“困难”了。所以,当问题发生后,我们通常需要收集反方向的 MTR 报告。
此外,互联网设施的维护或短暂的网络拥挤可能会带来短暂的丢包率,当出现短暂的10%丢包率时候,不必担心,应用层的程序会弥补这点损失。
网络延迟
除了可以通过MTR报告查看丢包率,我们也还可以看到本地到目的之间的时延。因为是不通的位置,延迟通常会随着条数的增加而增加。所以,延迟通常取决于节点之间的物理距离和线路质量。
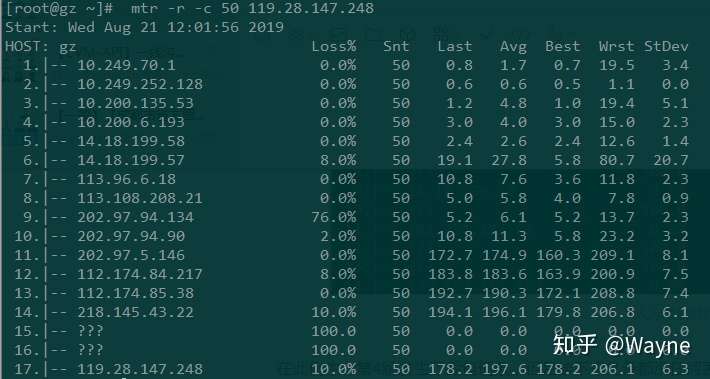
MTR查看网络延迟
从上面的MTR报告截图中,我们可以看到从第11跳到12跳的延迟猛增,直接导致了后面的延迟也很大,一般有可能是11跳到12跳属于不通地域,物理距离导致时延猛增,也有可能是第12条的路由器配置不当,或者是线路拥塞。需要具体问题进行具体的分析。
然而,高延迟并不一定意味着当前路由器有问题。延迟很大的原因也有可能是在返回过程中引发的。从这份报告的截图看不到返回的路径,返回的路径可能是完全不同的线路,所以一般需要进行双向MTR测试。
注:ICMP 速率限制也可能会增加延迟,但是一般可以查看最后一条的时间延迟来判断是否是上述情况。
根据MTR结果解决网络问题
MTR 报告显示的路由问题大都是暂时性的。很多问题在24小时内都被解决了。大多数情况下,如果您发现了路由问题,ISP 提供商已经监视到并且正在解决中了。当您经历网络问题后,可以选择提醒您的 ISP 提供商。当联系您的提供商时,需要发送一下 MTR 报告和相关的数据。没有有用的数据,提供商是没有办法去解决问题的。
然而大多数情况下,路由问题是比较少见的。比较常见的是因为物理距离太长,或者上网高峰,导致网络变的很慢。尤其是跨越大西洋和太平洋的时候,网络有时候会变的很慢。这种情况下,建议就近接入客户的节点。